I delivered this quilt and pillow set to my friend/client today and I can hardly wait to get a picture of it in its forever home.
I kept the scraps from the cutting table with my friend’s permission and have a plan in mind .
I discovered a quilt pattern in my book “Scrap Quilt Sensation” by Katharine Guerrero . https://tinyurl.com/y4mkqyla
The pattern is called Strictly Triangles. I’ve had this book since February 2011 . I was drawn by the vibrant colours. It’s time to actually use my triangle scraps and get this started!
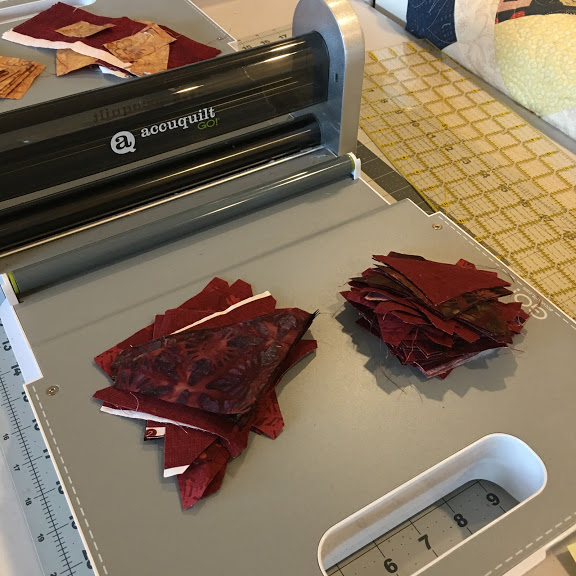
I pulled out my Accuquilt GO cutter and my two sizes of half square triangles . I cut down these scraps into useable triangles to add to the ones I’m collecting in my cupboard for this project. It will be a “Leaders and Enders” quilt which means that while I’m working on a main project, instead of cutting threads at the end of sewing, you insert two pieces that you want to sew together for another project and “sew off” onto them .
This brilliant idea is from Bonnie Hunter of Quiltville and it explains how she gets so many quilts done with her busy schedule. So I will be also building half square triangle units to be assembled later. Get it? Pure genius right!?
I love scrappy quilts and don’t tend to throw away fabric odds and ends if it is something that I can use in another quilt. My scrap bins are full so the ONLY new project I’m allowing myself as I deal with the last decade’s UFOs is scrap quilts from these bins. This quilt should keep me going for awhile!
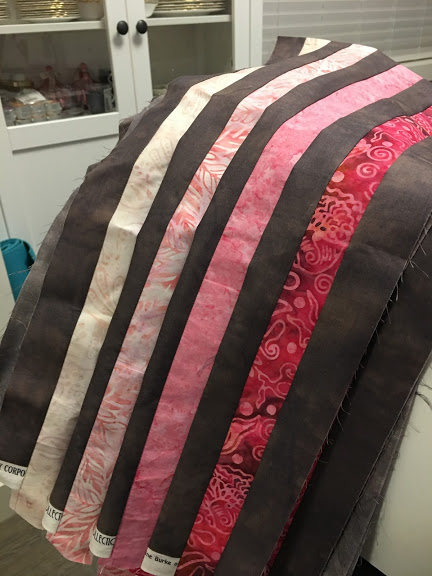
I’m also going to pull out my next UFO for personal stitching time (not to be confused with quilting for customers time ) This is my own pattern and this will be the fourth colour version I’ve made. The first was traditional Amish black with four other colours, the second one was greens and purple, the third one was black and gold and this one is pinks and greys.
Thanks for stopping by! I’m off to load a customer quilt and today I will also hopefully spend some time cutting down some more scraps from the cutting table for my Strictly Triangles Quilt. What are you working on today?
Have you had your eye
on an APQS quilting machine? Act now, our Demo Sale starts today, October 12, 2020!
Take advantage of
deeply discounted prices on those longarm quilting machines used as
display models this summer. Our demo machines are backed by our
unbeatable lifetime warranty. Inventory is limited and available on a
first-come, first-served basis.
Here’s a bit of a journey to share on the development of this latest pattern. A few years ago (like more than 10!) we had a quilting group in our then church that made quilts for all the new babies in the congregation . There were years when we had a bumper crop and could hardly keep up. But we did find some time to do some other quilts for other causes as well. One year we sent a bunch of quilts to some volunteers in Romania for their living quarters . They volunteered in an orphanage.
We had wanted to send baby quilts for the orphanage but were told that they don’t cover the babies with blankets . While this was a hard thing to comprehend by our North American standards, we understood and chose to bless their ministry another way.
We also had two ladies at that Church who were the kitchen volunteers and faithfully served us delicious food for ALL the monthly church luncheons and special events . Our quilting group wanted to recognize their faithful service and bless them, so two of us in the group made them these quilts. Mine was called Corn and Beans in Provence . The title seemed appropriate for a cook. This was all the way back in 2008!
Corn and Beans in Provence
It was so named because of the Provencal fabrics. Look familiar? This was the basis of my design for Polka Dot Party. I created the original pattern but never published it. I was asked by one of my local quilt guilds to provide a mystery quilt for them. Rather than reinventing the wheel, I decided that this was a good, simple and quick choice.
I then started play in EQ8 to get the pattern drafted. I wrote the mystery in three steps and the finale was published this past Monday. The ladies in the guild and in another facebook group are busy finishing their quilts. Here’s mine:
I also volunteered to contribute a free quilt pattern to APQS for their October blog post so it all seemed to fall into place.
This pattern is FREE in my store (link on the main page) and will be published by APQS later this month.
We are using the hashtags #polkadotpartymysteryquilt and #polkadotpartyquilt (for those not doing it as a mystery). I am looking forward to seeing all the different quilts.
Thanks for following this rabbit trail (ahem … journey) with me. If you’re a pattern designer, what is your inspiration? Do you get dreams about quilts and draft them from what you envisioned? Do you spot something in nature and use that as a launchpad for your own interpretation? Do you see a bundle of fat quarters and know exactly what you want to do with them? For me this time, I really, really wanted to play with polka dots and remembered my Corn and Beans quilt and married the two together.
Welcome to step three. For this step you are going to need the pieces that you cut and stored in bags H, I and J. These are your coloured and black polka dot 2 ½” squares and white polka dot 1 ½” x 8 ½” rectangles .
This step is a bit different than the rest. We are making some flying geese units but we are going to do foundation paper piecing. It just made the math easier. We are making 12 of these units . If you have never done foundation paper piecing, there are lots of tutorials online. I would also suggest using some scrap fabric to do one test block (so print 13 not 12 sheets) .
You will be following the numbering sequence on the foundation paper attached. Once you have filled the center column of the geese, you will add the white polka dot sides. Press towards the white and trim from the paper side. Be careful not to cut off the ¼” margin when trimming . Your units should measure 4 ½” x 8 ½” trimmed and will finish at 4” x 8” in the quilt.
Remove your paper and sew them into 4 sets of 3 . Be careful not to cut off the head of your geese when sewing them together.
We’re getting close to the finish. Watch for final clue and reveal next Monday.
Don’t forget to post your pictures and use the #polkadotpartymysteryquilt hashtag so we can find you!
Welcome to step two. For this step you are going to need the pieces that you cut in stored in bags D and E. These are your 5 ½” squares cut into triangles.
This is a very easy step. We are making 36 half square triangles.
Press towards the dark side. Do not trim. They will be trimmed in a future step .
And that’s all for now! The next clue will be published next Monday.
Post your pictures using the hashtag #polkadotpartymysteryquilt so we can all see your colours and progress .
Journey with me for a moment down a rabbit trail as I trace back from this current project on my design wall to the place where the idea was born or conceived of, as it were, and how it became a UFO.
Ah yes, those blessed UFOs . Just how do they find their way into bags and bins and then get buried on shelves?
In this case it all started when I belonged to a Yahoo group. For those who don’t know what that is, they were the online social connecting place for like minded people pre-facebook. In one of my groups, I joined a ‘swap’ . The idea was to choose a block that would finish at 12″, choose fabric for your block, cut it up and then send it with the fabric to six other people. They would in turn do the same. The end result was these blocks (the bigger ones that are red, white and blue anyway). They arrived already cut and just awaited my stitches to make them come to life . And I got that far. I didn’t want to make a small lap quilt in red, white & blue. What should I do with them?
At that time we had acreage and were operating a Bed & Breakfast in our home. I had already made bed quilts for all the guest bedrooms, but we had a barn.
It was a horse barn but we never had horses, nor were we planning on getting them . I’m not a fan of cobwebs, spiders or mice, so I have to confess I never really explored our barn other than maybe stepping inside. My hubby and kids did but not me.
However I could envision this as a rustic cabin, or a musician’s studio, or a guest cottage to add to our room inventory. We did explore what it would take to create another septic field, another well, zoning bylaws, etc . but alas, it was not to be. That didn’t stop me from dreaming up a quilt idea for the future guest bed that would occupy this space however. But it was just a dream, an idea that never really hatched. That is how the UFO was born. That was in approx. 2011.
Over the years I would pull out the bag with the blocks to see if an idea might spark. Then I would tuck them safely away again when no inspiration was found.
At some point I found this picture in a magazine which gave a sort of framework to what I envisioned for my blocks.
This was in Issue 54 of Quilting Today Magazine.
And now here we are in 2020 and those blocks are still a UFO. However, in the last month or so, I’ve been intrigued by a couple of sampler quilts I found on Pinterest. I can’t say I’ve been a fan of traditional sampler blocks that are equal sizes and set in predictable rows with sashing. But these more random samplers that keep the eye moving on a journey of discovery keep my interested and intrigued.
So where am I going with this story? Today I pulled out the project bag again and happened to have some vacant space on my design wall So I put my blocks up there in no particular order (the picture above).
Then I remembered I still had a bunch more orphan blocks all together in a small container. I decided to dive in to see what I could find that might add some interest to my sampler quilt.
More orphan blocks!
I was looking for blocks that had blue in them, though not exclusively, and red, and decided to add yellow/gold as another colour to try in my sampler. These are all different sizes and they may or may not be added to the quilt. That’s for more playtime on the design wall which could happen tonight when it cools down a bit.
Do you wait for your projects to call to you? I confess that I like working on projects that I’m enthusiastic about. I get bored easily and I’m quite impulsive. That could be why the other projects I’m “working on” have sat on my design wall untouched for weeks while I journey back to the spark of an idea to make a sampler quilt. It just wasn’t time in 2011 but it’s definitely time now!
I’m excited to add some fill in blocks here and there to make it work. It’s not going to be an EQ (Electric Quilt) exercise in drafting it out first. This is just going to be pure design wall, fly by the seat of my pants quilting. And I’m so excited about where it will lead me.
And to my other two projects…I’ll be back. But for now there’s a squirrel that needs my attention.
My daughter and I spent our Canada Day working on quilting projects. I pulled out a UFO to finish up and she started a new project using a charm pack.
My hubby and son joined us for a salmon BBQ later in the early evening. It was a fantastic celebrationalbeit different than the norm.
Here’s what I was working on:
I plan on adding another row and then some plain squares on each side . I want to elongate it and make it a bit bigger. It’s currently about 45” square.




 ) This is my own pattern and this will be the fourth colour version I’ve made. The first was traditional Amish black with four other colours, the second one was greens and purple, the third one was black and gold and this one is pinks and greys.